


Making your iPad Accessible
For people who require it, the iPad has a range of helpful accessibility features.
To get to the iPad’s accessibility options, first open ‘Settings’, and then choose ‘Accessibility’.

Accessibility features will be listed on the right. Let’s take a look at a few…
Vision Assistance
VoiceOver
This is a feature that reads the screen, so it can be very useful for people with vision problems.
To turn VoiceOver on, tap the slider, so that it turns green.

As soon as you turn VoiceOver on, you will hear the ‘reader’ speak.
Now every time you tap something, it will be selected, but it will actioned. The reader will read the button’s title, and to action the thing you’ve selected, you’ll now need to double tap on it.
It’s a good idea to do the VoiceOver practice, which is a blank screen you can use to practice gestures. Try single tapping, double tapping, swiping and all sorts on the screen, and the reader will let you know what each gesture does.

There are ways that you can modify the VoiceOver experience, such as by speeding up or slowing down the reader’s speaking rate.

We can also alter the speech of the speaker. Tap speech to open the options.

The iPad choices a voice for you, but if you tap on ‘Voice’, we can choose another speaker. There are English, American, Irish, Indian, South African voices and more; so you can pick a voice that best suits you.
I’m going to choose Aussie, Karen.

You can also insert pronunciations of words (or names) that might come up a lot, but that the reader doesn’t pronounce properly. This is something that you might add after using it for a while.
Tap ‘pronunciations’ in the speech menu, and then tap the + symbol in the top right corner to add a new pronunciation.
Here I’ve added the name Niamh, and written the pronunciation ‘Neev’ – the speaker will use this substitution phonetically, so ‘Knee-v’ (and other variations) would also work.
Tap ‘Play’ to check the speaker is saying your phrase properly, and when you’re done, tap ‘Pronunciations’ to go back.

In ‘Speech’, you can also change the speaker’s pitch. Click and drag on the slider to turn the pitch up or down (or swipe one finger up or down if you have VoiceOver switched on). The higher the pitch, the more excited your reader will sound!
There are lots of other VoiceOver settings to play with. Visit this page for more information:
https://support.apple.com/en-gb/guide/ipad/ipad67707d0d/ipados
Zoom
The Zoom tool is handy for people with sight difficulties, as it magnifies your screen view.
In ‘Accessibility’, tap on Zoom and turn it on. You should now see a smaller screen on your screen that magnifies a portion of your entire screen. This is the ‘Window Zoom’.
You can move the Window Zoom’s Window around the screen by clicking and dragging the oblong on the bottom of the zoom window.

You can change what the window is zoomed in on by dragging three fingers around the screen.
You can change how much you’re zoomed in by double tapping three fingers on the screen and dragging the fingers up or down.
You can get rid of the window by double tapping three fingers on the screen.
You can bring up zoom options by triple tapping three fingers on the screen, or by tapping once on the oblong on the bottom of the zoom window.

‘Choose Region’ gives you the option of having the zoom window or having the whole screen as a zoomed in area.
With the ‘Full Screen Zoom’, the gestures are the same.
You can also select ‘Choose Filter’ to change the colouring of the zoomed in area, so that is easier to see.

‘Show Controller’ displays a circular controller on screen, which better enables you to navigate.

‘Resize Lens’ allows you to make the zoom window bigger or smaller, or change the aspect ratio. Click ‘resize lens’ and then drag the circles to change the size and/or shape of the window.

For more information on Zoom, visit this page:
https://support.apple.com/en-gb/guide/ipad/ipad9a245e3e/ipados
Display and Text Size
Display and text size allows you to change a lot of settings to make an iPad more accessible for people with sight difficulties.
In ‘Accessibility’, tap on ‘Display and Text Size’ to see all the features. There are a lot of features, so we’ll look at the main ones.
To make text stand out more, you can tap on the button beside ‘Bold Text’ to make text thicker.

To make the iPad’s text size larger, you can tap on ‘Larger Text’ and use the slider to increase (or decrease) the text size. This changes text size in all applications that allow it to do so.
If the text isn’t quite big enough, you can tap the button beside ‘Larger Accessibility Sizes’ to increase the range the text size can adjust to.

‘Increase Contrast’ is a handy setting – tap the button beside it to turn this setting on. By turning on this setting, the iPad’s display goes from this:
To this:


‘Smart Invert’ is another useful setting for people with vision problems – tap the button beside it to turn this setting on. By turning on this setting, the iPad’s display goes from this:

To this:

There are a lot more features that we haven’t covered here, so for more information on Zoom, visit this page:
https://support.apple.com/en-gb/guide/ipad/ipad9a246013/ipados
Magnifier
Magnifier is an accessibility tool that enables you to zoom in on things in your environment, such as books and labels, using the iPad’s camera.
Unlike other Accessibility tools, Magnifier isn’t stored in the Accessibility Settings – it’s an app. However, you do have to enable it in the Accessibility Settings. Tap on Magnifier.

On the next screen, turn it on.

And now your magnifier app will be available on your home screen.

When Magnifier opens, it will look similar to the camera app, but there will be a zoom controller on the screen. You can slide the yellow circle to the right to zoom in on your view.

The Magnifier also has other controls that can enable you to see better.

For more information on the Magnifier app, visit this page:
https://support.apple.com/en-gb/guide/ipad/ipadd86f5027/ipados
Hearing Assistance
Hearing Devices
‘Hearing Devices’ allows you to connect to hearing devices that are made to work with iPads and iPhones. When a device is turned on nearby, the device will appear in the ‘MFI Hearing Devices’ section.
You can also turn on ‘Hearing Aid Compatibility’ in order to improve the quality of sound you can hear from the iPad.

Sound Recognition
‘Sound Recognition’ is a handy feature for people who are hard of hearing, which listens out for specific sounds for you, then shows a notification to make you aware.
To use ‘Sound Recognition’, first turn the slider to on, and then tap ‘Sounds’ to choose which sounds your iPad will listen for.
N.B. ‘Hey Siri’ cannot be used when ‘Sound Recognition’ is turned on.

Here are all of the current choices:

Audio/Visual
Audio/Visual settings can help you change the way sounds, music and alerts play on your iPad.

Subtitles and Captioning
To turn on closed captions and subtitles that are specifically for people who are deaf or hard of hearing, set the slider to on.
You can then change the style of subtitles, so that they are easy for you to read.
N.B. These captions and subtitles will only work in supported apps.

Physical Assistance
Touch
The touch settings allow you to change how the iPad reacts to your touch. It’s really useful if you have shaking hands or struggle to press buttons quickly enough.
In ‘Accessibility’, tap on ‘Touch’ to see all the features. There are a lot of features, so we’ll look at the main ones.

Assistive Touch
‘AssistiveTouch’ enables you to change the way that you interact with the iPad. Tap it to open a new menu.
When you turn ‘AssistiveTouch’ on, a button icon will appear on the side of your screen. This button fades when you’re doing other things.

When you press this button, options are displayed to you. The options will look like this:
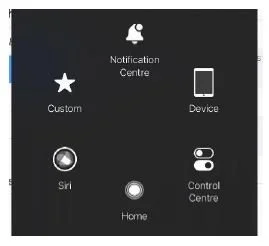
This functionality allows you to, for example, tap home, instead of having to use the physical home button on your iPad. You can tap another part of your screen to close this menu.
To edit this menu, and choose functions that you use more often, in the ‘AssistiveTouch’ menu, tap on ‘Customise Top Level Menu’. You can tap on each item to change what that section of the menu does.

Touch Accommodations
Touch Accommodations are handy if you have shaky hands. Tap ‘Touch Accommodations’ to see your options.
First, turn Touch Accommodations on, and then you can adjust your settings.

Voice Control
‘Voice Control’ allows you to use the iPad without touching the screen, by using your voice. For example, you can say ‘go home’ instead of pressing the home button, or you can say ‘swipe left’ to move to the next screen, or you can say ‘tap play’ to resume your Netflix session.
First, open ‘Voice Control’ and then tap ‘Set up Voice Control’ to get started. Once your iPad has downloaded the small piece of software, you’ll be able to use Voice Control even when not connected to the internet.
You can get started straight away, or fiddle with the settings.

Home Button
The ‘Home Button’ options can change the way the iPad’s home button functions. Tap ‘Home Button’ to open the settings.
You can change the click speed. If, for example, you struggle to double click the home button quickly, you can alter the click speed to slow (or even slowest), to make the iPad wait a bit longer to record how many times you’ve clicked.

You can also turn Siri’s response to pressing and holding the home button off.
